
“How much did that plastic bottle shrink in the dishwasher?”

My daughter measures the ruined plastic water bottle. (Photo: Shala Howell)
This summer, I got my daughter a couple of high-volume plastic water bottles to use when she goes on adventures outside. I did try to switch the family to metal or glass water bottles, but my daughter never wants to take those outside, because they’re too nice.
The “Don’t worry about that. I’d rather you use it and destroy it than not use it at all” approach has completely failed. Meanwhile, summer is approaching, bringing with it the usual dose of warm weather and daughterly dehydration.
So when I saw some high-volume, inexpensive reusable plastic water bottles on sale at my local Safeway I bought a couple. Sadly, I didn’t notice they were also hand wash only until I got home.
Drudgery aside, those plastic water bottles were just what my daughter wanted.
My daughter totes them quite happily outside, and brings them back in with just enough dirt to convince me that she’s actually used them.
I wish I could claim that I had put the ruined purple one into the dishwasher for a good reason. I would love to say that my daughter had taken it outside and it had gotten so covered in mud and slime it would have been unusable without proper sanitation so I opted to run it through the dishwasher in lieu of dousing it in bleach.
But no. It was actually fairly clean. It shrank because I got lazy.
Our dishwasher has been broken for a couple of weeks, and after an eternity of hand-washing everything I was so thrilled to have a working dishwasher again, I just tossed everything in there. Even the stuff I knew I shouldn’t.
Whoops.

Fortunately for me, shrinking plastic turns out to be a great at-home summer science project.
Which means I can turn this into a teachable moment that’s more meaningful than “Don’t put plastic in the dishwasher.”
I owe this insight to Wayne Goates at NSTA News. In 2002, he took the trouble of outlining a basic science project that parents can do with their kids at home to make shrinking plastic both fun and educational.
But before I get into the details of Goates’ experiment, and how I reworked it to suit our situation, let’s take a moment to learn why plastic shrinks when you heat it.
Why does some plastic shrink in the dishwasher?
I say some, because as you probably know from life experience, not all plastic shrinks in the dishwasher. Some of it just scratches up and gets cloudy, while other kinds of plastic don’t appear to be affected at all for quite a long time. Goates goes into much more detail about the why’s of this at his place, but I’m not going to here. I’m going to give you the very simplified explanation that I gave my daughter.
This particular type of plastic shrinks when heated because of the way it’s made. Basically, during the manufacturing process, a lump of this shrinkable plastic was heated, stretched into its water bottle shape, and held there while it cooled. Once cooled, the plastic had essentially frozen into the shape of a water bottle.
When you heat them again, these kinds of plastics have a tendency to go back to their original shape. How successful they will be at that depends on how hot they get, how evenly the heat is applied, and how long they stay hot. I don’t think my purple water bottle started life as a proto-water bottle with a mushroom base, for example. I suspect its new form may be more reflective of its awkward middle school years.
So how can we turn this unfortunate event into a summer science project?
Goates begins his version of this experiment by having his students carefully craft a metric ruler out of a plastic salad lid. He then heats the rulers in a toaster oven until they shrink. Students finish the experiment by measuring the shrunken ruler and calculating how much the plastic shrank and in which dimensions.
(There are several things to be careful about when shrinking plastic in a toaster oven, including setting your toaster oven too high, which can cause the melting plastic to release toxic gases, so I strongly recommend that you read Goates’ original experiment before trying this at home.)
I have a checkered history that includes setting every toaster oven I’ve ever touched on fire, so instead of making and melting Goates’ metric rulers, The Twelve-Year-Old and I just used the already shrunken water bottle and its not-yet-shrunken twin.
Since the two bottles were once the same size and shape, all The Twelve-Year-Old had to do was measure the height, radius, and volume capacity of both bottles. (Science!) Then she could use the numbers to calculate the amount of shrinkage. (Math!)
Step 1: Assemble the supplies.
For this experiment, we needed the before and after bottles, a measuring tape, pen, paper, and a calculator.
Step 2: Define your equations and terms.
My daughter had calculated the volumes of rectangular prisms and cubes in school, but not cylinders, so we looked up the formula for calculating the volume of a cylinder, V = πr2h, and wrote it down on our paper. I also broke down the formula into its component parts and made sure that she knew what each one meant (V is the volume, r is the radius of the base, and h is the height). We came to a Caterpickles agreement to use 3.14 for π to simplify things, even though that introduced some inaccuracies The Twelve-Year-Old wasn’t sure she wanted to live with.
We also talked about how we would calculate the shrinkage once we’d done all our measurements and volume calculations. In his example, Goates gives the formula:

Modifying that to suit our situation gave us a formula that looked more like this:

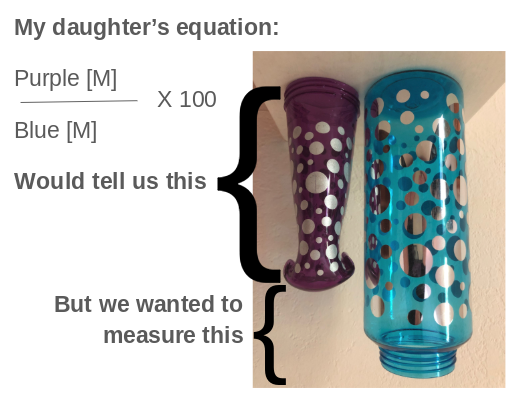
where [M] might be the height, radius, or volume.
This prompted a conversation about why we couldn’t simply divide purple’s measurement by blue’s and multiply that by 100 to get our answer.
My daughter pointed out that she did that calculation all the time when computing her grades at school, and it worked fine. “For example, Mommyo, if you get 18 questions out of 20 correct, that means you got a 90% on the test.”
That turned out to be a very helpful example, because it gave me a better way to explain what we were actually measuring in this experiment. When she calculated her grades at school, my daughter was measuring the percentage of things that were still there (the questions she had gotten right). In this experiment, we were interested in measuring what was missing. That meant, we were going to do the calculation she would use if she were trying to figure out what percentage of questions she had gotten wrong on the test instead of the ones she’d gotten right. It’s just that in this experiment, we would be measuring the height (or radius or volume) that was missing.
Those explanations sorted, we were ready to start the experiment.
Step 3: Measure the height and radius of the two bottles, and use that to calculate the volume.
Goates’ experiment uses two-dimensional rulers, so he has his students measure length, width, and height. We’re working with three-dimensional cylinders (and former cylinders) here, so The Twelve-Year-Old measured the bottles’ height and radius, and then calculated their volume, using the formula V = πr2h.

Step 4: Calculate the shrinkage and its projected effect on volume.
Next, we calculated the shrinkage of the various dimensions using this basic formula:


Step 5: Analyze our results.
We paused for a moment here to assess why we had gotten those particular results.
Why had the radius shrunk more than the height? Did that mean that the plastic shrank more in one direction than in another?
Maybe, but The Twelve-Year-Old thought it might actually have been a measurement problem. You see, she measured the widest point on both bottles to get the radius. On the purple bottle, that meant measuring the opening of the bottle. But on the blue bottle, that meant measuring the base. As you can see from the bottle pictures above, the opening was originally a smaller size than the base, so that very likely distorted the final results.
Why had the volume shrunk so much more than either the height or the radius?
The Twelve-Year-Old pointed out that the volume of the bottle depended on the height and the radius. Any shrinkage in those numbers would naturally be magnified in the volume.
Step 6: Compare our calculated volume for the purple bottle to its actual volume.
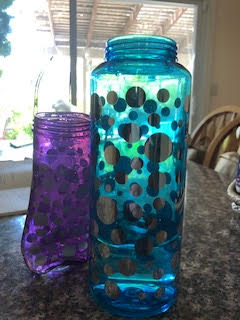
There’s a lot of curl in the base of the purple bottle, and its sides are anything but straight. The equation we used to calculate the volume assumes that the radius remains constant throughout the entire shape. Our purple bottle’s radius obviously did not remain constant.
Although Goates’ experiment had stopped with the calculations, we decided that we wanted to know how close our calculated volume came to the melted cylinder’s actual capacity.
To test it, we filled the shrunken purple container with water. Then we poured the contents of the purple water bottle into the blue one. Then we calculated the volume of the water in the partially filled blue container.

I am certain that there must be a mathematical equation that can account for the volume differences generated by that mushroom base and the curvy sides, but for now, my daughter and I are content to know curves really matter when it comes to volume calculations.
Want to try this at home, without ruining your plastic cups first?
The science in our house may be accidental at best, but Wayne Goates is much more purposeful about it. He has instructions for a start-from-scratch science experiment that uses plastic salad lids cut into little rulers, in case you want to explore the science of plastic shrinkage with your kids (or students) on your own.
His write-up also includes much more detailed information on why the shrinkage happens the way it does, and some safety tips for folks who try this for themselves.
Related Links:
- Shrinking Science (NSTA News)
- How to Calculate Volume (WikiHow)

What are you thinking?