
“How do storm glasses work?” Part Two: The Testing
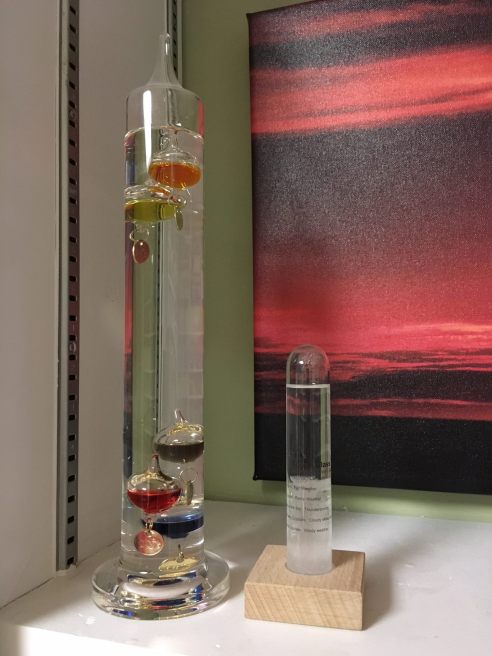
My retro weather center. The storm glass is on the right, making its bold prediction of cloudy skies in Chicago in winter. The glass tube on the left is Galileo’s thermometer. We’ll talk about how/if that sucker works some other time.
(Photo: Shala Howell)
About two weeks ago, after noticing that our replica storm glass had been predicting cloudy skies more or less continuously since we acquired it six months ago, The Nine-Year-Old and I began to wonder how storm glasses worked. You can read our initial research on the topic here.
In a nutshell, we learned that storm glasses are not very reliable weather predictors. According to a series of tests performed in Cecil Adam’s lab at the Straight Dope, storm glasses only correctly predict rain about half the time.
Which got us wondering, if the storm glass isn’t reacting to changes in local weather conditions to make its predictions, what is it reacting to?
The Top Contenders
Further research narrowed the candidates to three contenders: changes in pressure, light, or temperature. Since it was early February (and felt like it), we decided that testing the effect of temperature changes would be the easiest. So we did that first.
Our Hypothesis
The storm glass will react to changes in temperature, most likely by forming more crystals at lower temperatures.
Our Methodology
Our plan for testing our hypothesis was simple: We’d move the storm glass in front of a working window. When we wanted to cool things down, we’d open the window. When it was time to warm things up again, we’d close the window.
Since the average daytime temperatures outside that week were in the 20s and 30s and our temperature inside is more or less in the low 70s, we expected this simple trick would let us change the temperature easily by some 30 or 40 degrees. That should be more than enough to determine whether the crystals in the storm glass are responding to changes in temperature.
To keep things simple, we decided to use the master bathroom. It’s a fairly small room with a dedicated radiator, so the bathroom both cools off and warms back up again pretty quickly.
Mommyo extracted the electronic meat thermometer Daddyo had gotten for Christmas from Daddyo’s cooking drawer. When The Nine-Year-Old tried it in the bathroom, she found that it was both easy to read and seemed to measure the ambient temperature well. The experiment was on.
Our Equipment
The equipment requirements for this experience were pretty straight-forward. To conduct it, we needed:
- The storm glass itself
- A working window with ledge and screen
- Thermometer
- Lab notebook & pen for recording observations
- Digital camera to record crystal formations
- Piece of blue paper to provide a consistent background for the test photos
Our Process
Step 1: Move the storm glass to the test environment.
Two days before the experiment was to begin, we moved the storm glass to the master bathroom to allow it to adjust to its new environment. We observed it every morning and evening, and when its crystal formation appeared to have stabilized, we began the tests.
Step 2: Record the storm glass’s appearance and its ambient temperature at steady state.

Initial crystal configuration at the start of the experiment. Note the pale crystal at the tip of the storm glass, well above the liquid, as well as the cool mushroom-like crystal about halfway down the glass. (Photo: Shala Howell)
We also noted the time, weather conditions outside (just in case they were relevant), and took a picture of the initial crystal formation.
Experiment Start Time: 3:55 p.m.
Ambient Temperature: 71°F
Weather Outside: Cold! 25°F, cloudy, no rain or snow
Crystal Appearance: Crystals at the top, large mushroom-like crystal in mid-section
Associated Weather Prediction: Thunderstorms, we think
Storm Glass Position: Window ledge inside master bath, window closed
Step 3: Lower the ambient temperature.
We opened the window, closed the door to the bathroom, and set a timer to remind ourselves to check on the storm glass in about 2 hours.
Step 4: Wait two hours, then record any changes.

Photo taken from the side so that you can see the sliding formation of crystals. (Photo: Shala Howell)
After two hours, the large mushroom crystal was replaced with a mass of dense, but fluffy looking crystals. The mass was distinctly taller on the side closest to the window screen (the colder side).
Current Time: 6:15 p.m.
Lapsed Time: 2 hours, 20 minutes
Ambient Temperature: 52°F
Weather Outside: Still very cold. 20°F, cloudy, no snow or rain
Crystal Appearance: Lots of dense crystals, more on the side facing the window
Associated Weather Prediction: The Nine-Year-Old thinks this crystal formation is best described as murky liquid, so we’re going with rain.
Storm Glass Position: Window ledge next to the screen, on the exterior of the glass itself, but with the window open so that the storm glass was still exposed to heat from the bathroom.
Step 5: Warm the room up again.
We moved the storm glass back to the inside window ledge and closed the window. We set a timer for two hours, but got caught up in a really good episode of Netflix’s Series of Unfortunate Events. We may have decided that science (and bedtime) could wait for the end of the episode.
Step 6: Some time later, check the storm glass again, and record any changes.

Photo: Shala Howell
The dense mass of crystals is definitely getting smaller. It’s back to looking a bit mushroomy, even.
Current Time: 10 p.m.
Lapsed Time: 2 hours, 45 minutes
Ambient Temperature: 73°F
Weather Outside: 14°F
Crystal Appearance: The mass of crystals appears to be dissolving as the storm glass warms up
Associated Weather Prediction: Rain?
Storm Glass Position: Window ledge inside master bathroom with window closed
Step 7: Review your testing methodology and adjust it as necessary.
Based on the results of Steps 1-6, it seemed pretty clear to us that more crystals form at colder temperatures. But simply opening and closing the window next to the storm glass only created about a 20-degree variance in ambient temperature. We wanted to see if we could do better than that.
So we decided to place the storm glass out on the exterior portion of the ledge between the window glass and the screen, and close the window behind it. This would keep the storm glass from receiving warmth from the air inside during the experiment. And as The Nine-Year-Old, who becomes more self-sustainable every year pointed out, closing the window would be more energy-efficient too.
Step 8: Record the storm glass’s appearance and local conditions before applying the new test parameters.

If the crystals look like clouds, does that mean we’ll have clouds? (Photo: Shala Howell)
Current time: 10:06 a.m.
Lapsed time: 12 hours, 6 minutes
Ambient temperature: 73°F
Weather Outside: Cold! 29°F, little wind
Crystal Appearance: A large portion of the crystals dissolved over night
Associated Weather Prediction: We can’t tell. Cold?
Storm Glass Position: Window ledge inside bath with window closed
Step 9: Cool things down according to the new specifications.
To do this, we placed the storm glass on the portion of the ledge between the window glass and the window screen. Then we closed the window, and set a timer for one hour.
Step 10: Wait one hour, and then see what’s changed.

Photo: Shala Howell
Holy cow, that closed window made a big difference!
Even though the testing period was much shorter — less than half the time of the previous cold exposure in Step 4 — the crystal formation was much more impressive. The crystals were so dense in fact that The Nine-Year-Old and Mommyo had a heated discussion about their nature. Was this what the storm glass text describes as murky water, or was the whole thing simply frozen over?
Current Time: 11:08 a.m.
Lapsed Time: 62 minutes
Ambient Temp: 32°F
Weather Outside: 29°F, clear
Crystal Appearance: The crystals are still at the top, but the rest of it is what The Nine-Year-Old calls murky water and Mommyo calls a slushy mess.
Associated Weather Prediction: So much rain
Storm Glass Position: Window ledge next to screen, with the glass window closed.
Step 11: Warm the storm glass up again.
We brought the storm glass back inside and closed the window. We set a timer for one hour, to see if the crystals in the storm glass reacted to being in warmer air as dramatically as they do to being in the cold.
Step 12: Wait one hour then, record the changes.

Photo: Shala Howell
Well, that was sort of dramatic. I mean, half of the crystals are gone now, but there’s still a lot of dense slush there.
Experiment Notebook
Current Time: 12:15 p.m.
Lapsed Time: 67 minutes later
Ambient Temp: 72°F
Weather Outside: 32°F
Crystal Appearance: One-third to one-half of the slushy mess has dissolved away
Associated Weather Prediction: This is still probably murky water, so we are going with rain
Storm Glass Position: Inside with the window closed
Step 13: Wait another 30 minutes and record the changes.

Photo: Shala Howell
There was some more melting (excuse me, dissolving), in response to the warmer conditions, but not really a lot. The storm glass was now only half-full at best of mush. The crystals are a lot less dense too.
Experiment Notebook
Current Time: 12:54 p.m.
Lapsed Time: 39 minutes later
Ambient Temp: 70°F
Weather Outside: 32°F
Crystal Appearance: Definitely down to 1/2 of the slushy mess has dissolved away
Associated Weather Prediction: Rain?
Storm Glass Position: Inside with the window closed
Step 14: Leave the storm glass alone for several hours, then return to record the changes.
The Nine-Year-Old and I both wanted to move on to doing things outside the house at this point, so we made a Caterpickles agreement that we would go live our life and let whatever happened to the storm glass in the intervening hours go undetected. We did check it once more at bedtime, but I apparently forgot to photograph it, so you’ll have to take our word for what we found.
Over the intervening 8 or so hours, even more of the crystals dissolved away. The dense mass had retreated to the bottom third of the storm glass. The rest of it was back to being clear liquid.
Current Time: 9 p.m.
Lapsed Time: 8 hours, 6 minutes later
Ambient Temp: 70°F
Weather Outside: 20°F
Crystal Appearance: Two-thirds of the slushy mess has dissolved away, leaving a mass of dense crystals at the bottom of the storm glass
Associated Weather Prediction: Still going with rain
Storm Glass Position: Inside with the window closed
Step 15: Leave the storm glass alone overnight. Return in the morning to see if anything else has changed.
Any further changes were so slight, they were hard to detect. The Nine-Year-Old was pretty certain that the crystals only covered the bottom quarter of the storm glass, instead of the bottom third. So we’re going with that. Still no pictures. Apparently our camera man quit.
Current Time: 9:15 a.m.
Lapsed time: 12 hours, 15 minutes
Ambient Temp: 70°F
Weather Outside: 36°F
Crystal Appearance: Crystals down to 25%
Storm Glass Position: Inside with the window closed
Given the length of time that had passed and the very slight change in the crystal formation, The Nine-Year-Old and I decided that this was probably the storm glass’s new steady state, and ended the experiment.
Conclusion
After our brute force temperature experiment, The Nine-Year-Old and I are pretty convinced that temperature variables are a big factor in crystal formation. The crystals formed quite rapidly in response to drops in temperature, but retreated at a more sedate pace as the storm glass warmed back up.
However, after the dose of cold in Step 10 that turned the contents of the storm glass to slush, the character of the crystals changed. No longer the light, flaky fern-like crystals we had at the beginning, these new crystals are dense, gritty, and far less attractive.
We moved the storm glass back to the office, hoping that mass would go away. It’s been a week now, and while there are some fluffy crystals at the top of the crystal formation, that dense ugly mass is still there.

Inquiring Janes want to know: “Did we break it?” (Photo: Shala Howell)
So naturally, now we want to know, “Did we break it?” Or as The Nine-Year-Old put it this morning, “How do we reset this thing?”
Based on the results of our tests last week, a more aggressive form of heat is clearly called for. How we plan to accomplish it is a post for another day.
Related Links:
- “How does a storm glass work?” Part One: The Pondering (Caterpickles)
- (Not even sort of) Wordless Wednesday: Storm Glass Fun (Caterpickles)
- “How do we reset the storm glass?” (Caterpickles)

3 Responses to ““How do storm glasses work?” Part Two: The Testing”
[…] Last week, we tested our storm glass to see whether the crystals were forming (or dissolving) in response to changes in temperature. Short answer: Yes. […]
LikeLike
[…] “How do storm glasses work?” Part Two: The Testing (Caterpickles) […]
LikeLike
[…] “How does a storm glass work? Part Two: The Testing” (Caterpickles) […]
LikeLike